Thursday, December 22, 2016

Copycat Mystic Mint Cookies

My husband's family always had Mystic Mint cookies for Santa.  They don't exist anymore so my daughter and I dug up a recipe and this is our take on it...

Mystic Mint Cookies

Ingredients:
For Cookie dough:

2 cups sugar
2 sticks butter (1 cup), softened
2 tsp. vanilla
2 eggs
4 ounces unsweetened chocolate, chopped up and melted
2 cups flour
1 tsp. salt

For Peppermint Frosting:
5 cups powdered sugar
1 stick (1/2 cup) butter, softened
6 Tbsp. milk
1 tsp. peppermint extract

For Chocolate Drizzle:
1 stick (1/2 cup) butter, softened
4 Tbsp. corn syrup
12 oz. dark chocolate chips

For cookies cream the sugar and butter together until fluffy.  Add eggs and vanilla.  Melt the chocolate in a double boiler or in microwave.  Add to eggs when cool.  Mix well, making sure to scrape bottom and sides of bowl.  Then add the flour and salt.  

On a greased cookie sheet add teaspoon fools of dough, try to form it into a vague shape of a ball.  Then smoosh down in a flat circular shape (think Thin Mints shape).  

Bake at 375 degrees for 8 minutes.  

For the Peppermint frosting mix all ingredients together until light and fluffy.  When the cookies are cool frost each cookie.

For the chocolate drizzle melt all ingredients on low in a small saucepan.  Drizzle onto peppermint frosting.  Enjoy!


Monday, December 19, 2016

My Holiday Menu

I love holiday baking.  Here is what we are eating this season.

Christmas Eve:

Every Christmas Eve we have a "Shepherd's dinner" which means we mind of eat what we think they would have eaten when the angel came.  We fudge this a little bit but mostly its things like: nuts, dried fruit, grape juice, dried meats, breads, crackers, and cheese.  We also dress up like shepherds.

My favorite thing is to melt Fontina, olive oil, and rosemary in the oven and eat it with good bread.  

Usually we end with fudge.  Here is my favorite recipe:  http://www.justgetoffyourbuttandbake.com/fudge-smooth-as-silk/

Its tastes just like my mom's fudge but it never fails to turn out.

Christmas Morning:
We have really good chocolate milk and cinnamon rolls.  I make these the week before and freeze them so I don't have to bake any more than I have to on Christmas.

Christmas Dinner:

I would have ham, but my husband hates it so we have Thanksgiving dinner all over again with a few additions.

Turkey (with Alton Brown's brine)

Holiday Sweet Potatoes

3 cups cooked and mashed sweet potatoes
1 cup sugar
2 eggs, beaten
¼ cup milk
½ cup shredded coconut
1 tsp. salt
1 tsp. vanilla
½ cup margarine, melted

Topping:
1 cup brown sugar
¼ cup margarine, melted
1 cup chopped pecans or walnuts

Preheat oven to 350.
Mix sweet potatoes, sugar, eggs, milk, coconut, salt, vanilla, and margarine.  Pour into greased 2 quart casserole dish.  Bake for 20 minutes.  Combine brown sugar, pecans, and margarine to make topping.  Sprinkle on sweet potato dish.  Bake for another 20 minutes until brown.


Serves 8

Mashed Potatoes and gravy

Rolls

Raspberry Salad


1 small pkg. Raspberry jello
3 oz. Cream cheese

          Dissolve jello in 1 c. hot water.  Combine cream cheese and dissolved jello in blender until smooth.  Add ½ c. cold water.  Let set up in refrigerator for about one hour.

Then add:
1 pkg. Thawed raspberries
1 pkg. Dream whip (whipped)

          Refrigerate until firm.

For dessert this year we are having a Raspberry Chocolate Piecaken.  
http://piecaken.blogspot.com/2013/11/raspberry-pie-nestled-in-flourless-dark.html

Monday, December 5, 2016

Easy Homemade Ornaments

We just made homemade ornaments. We usually make some every year.  These ones were easy.


Step One- Buy glass globes.  Walmart had them for a great price!  Found them in the craft section.

Step Two- Unwrap a few crayons (less colors the better) and break off a few small pieces.

Step Three- Insert crayon pieces in globe.

Step Four-  Hold globe in hand (use an oven mitt if you need to) and place a blow dryer on its hottest setting near wear the crayons are lying.

Step Five-  Move the globe around so the melting crayons cover the surface of the globe.  This will take a couple of minutes depending on how much you want covered.

Step Six- Shake out the crayon remnants if you can (we couldn't) and put the top back on.

The hardest part was the heat from the blow dryer.

 This one was a red, blue, and white crayon.
 This was an orange, red, and green crayon.
 This was done with green and purple crayons.
I used blue and white.  Forgive the no shower or make-up look.

My husband used red and green.  Those colors mixing turn to warm.  Warning!

Thursday, December 1, 2016

Garlic Pasta

I didn't get a picture of this because we ate it too fast.  It was so quick and easy.  My husband loves garlic.

Garlic Pasta

Ingredients:
1/2 Tbsp. olive oil
4 cloves garlic, minced
1 shallot, finely chopped
2 cups chicken broth
1 1/2 cups milk
1 tsp. salt
8 ounces fettuccine
black pepper, dried oregano, basil, and red pepper flakes, to taste
1 cup finely chopped spinach

Heat the olive oil in a large pot over medium heat.  Add the garlic and shallot and cook until translucent (about 2 minutes).

Add the chicken broth and milk.  Add salt and stir.  Add the dry pasta and gently stir until submerged in the liquid.  Bring to a boil and simmer for 20 minutes until the sauce has thickened and the pasta is al dente.  Add seasonings.  Throw in the spinach and serve.

You could also add cheese to this or other vegetables.

Crochet Baskets

I have gotten obsessed with crocheting baskets.  I found this Macrame yarn on clearance at Hobby Lobby and made these two baskets.  


 Then I used hemp rope and yarn together to crochet this...


 I'm giving it to my daughter for her jewelry because it doesn't all fit in her jewelry box.

This is how you crochet rope and yarn together.  Its a little tricky because sometimes you lose one of the strands.
 I twisted it together like it was one strand and make sure you pull both strands through each time.
Here is my favorite basket pattern:

Chain 3
1- 7 hdc in 3rd chain from hook.  Join with a slip stitch.  (8 hdc)
2- Chain 2, 2 hdc in each stitch.  Join with a slip stitch.  (16 hdc)
3- Chain 2, hdc in same sitch, 1 hdc in next stitch (2 hdc in next stitch, 1 hdc in next stitch) Join.  (24 hdc)
4-  Chain 2, hdc in same stitch, 1 hdc in next 2 stitches.(2 hdc in one stitch, 1 in next 2 stitches).  Join (23 hdc)
5- Chain 2, hdc in same stitch, 1 hdc in next 3 stitches.  (2 hdc in one stitch, 1 in next 3 stitches).  Join (40 hdc)
6- Chain 2, hdc in same stitch, 1 hdc in next 4 stitches.  (2 hdc in one stitch, 1 in next 4 stitches).  Join (48 hdc)
7- Chain 2, hdc in same stitch, 1 hdc in next 5 stitches.  (2 hdc in one stitch, 1 in next 5 stitches).  Join (56 hdc)

At this point you can stop or keep going depending on what circumference you want for you basket.
Just keep increasing by 1 stitch.  So the next would be 2 in one stitch, 1 in the next 6, etc.

When you have achieved the right circumference continue as follows:

8- Chain 1, sc in the front loops only all the way around (this will create a ridge).
9- Chain 1, sc in both loops all the way around.
Continue doing this until you have the height you want.

To finish you can have choose between two different handles.  In my first two baskets I did the two side handles

16- Sc in next 13 stitches (might have to adjust based on circumference), ch 10, skip next 10 stitches, sc in next 26 stitches, chain 10, skip next 10 stitches, sc in next 13 stitches.  Join.

17- Sc in next 13 stitches, 12 sc in each chain.  Sc in next 26 stitches, 12 sc in chain, sc in next 13 stitches.  Join and finish off.

Weave in ends.

OR

Chain the desired length of handle and count until half way from the start of your chain.  Join with a slip stitch into the half way point.  Then I single crocheted in each chain to make it thicker.


Thursday, November 3, 2016

Preschool Party

My daughter is in a mother run preschool group and we had a Halloween party last week.  Here is what we did:

Ghost story/Craft
Tell a story about a mother ghost who goes to the store to get white food (ghosts only eat white food) and tells her children to not eat anything while she is gone.

The first ghost eats a strawberry and turns pink.
The second ghost eats a blueberry and turns blue.
The third ghost drinks orange juice and turns orange.
The fourth ghost eats broccoli and turns green.
The fifth ghost thinks if he eats ice cream that is white he will be fine but it was chocolate chip ice cream so he turns speckled.
The mother ghost come home, scolds her ghosts, and feeds them white food so they turn white again.

Then we colored plastic spoons so they could retell the story.
 Halloween dance party with instruments.

 Toilet paper mummies.
 Sugar cookie decorating.
 Pin the nose on the witch.

 Story time corner.
 We ended with musical rugs.  In my version you don't get out if you don't get a rug you have to share until all the kids are wedged onto one rug.

 The aftermath.

Friday, September 23, 2016

Crock Pot Potato Soup

Crock Pot Potato Soup

 Crock pot Potato Soup

Ingredients:
1 (30 ounce) package of frozen hash-browns
2 (14 ounce) cans chicken broth
2 (10.75 oz.) cans cream of chicken soup
1/2 cup chopped onion
1/2 tsp. pepper
1 tsp. garlic powder
1 tsp. basil
1/2 tsp. parsley
1 (8 oz) package cream cheese

For garnish:
1/2 cup chopped green onion
1 package cooked and crumbled bacon (I cooked mine in the oven.)

Combine all ingredients except garnish in a crock pot.  Cook for five hours.  Stir occasionally to get the cream cheese combining with the rest of the ingredients.

Garnish with green onion and bacon.  Enjoy!


Friday, September 16, 2016

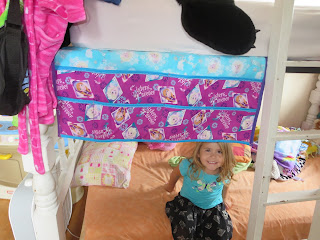
Bedside Organizer

Bedside Organizer
 My kids constantly have junk in their beds and library books.  All my efforts to get them to put them on their dressers have failed so I'm trying these.
 Supplies needed:
-30" by 25" fabric x2 one for front and one piece for back
-30" by 10.5" fabric x2 one for front and one for back
-30" by 6"  fabric x2 one for front and one for back

-fusible interfacing (I used high loft) to sandwich between each piece
130" of 1 inch wide bias tape  (You can make your own.  I was lazy.)

Cut each piece of fabric out, sandwich interfacing between front and back and iron according to package instructions.

Put bias tape on the top of each pocket piece the 30" by 10.5" piece and 30" by 6" piece.

Sandwich two pocket pieces together and baste together on the sides.  Mark a line five inches in the front pocket.  Sew a line just on the front pocket.

Then attach both pockets to the main piece.  Find the half way line and sew through front and back pocket.  Then sew bias tape all the way around.

Lift up mattress and place the empty half of the fabric underneath.


Wednesday, September 7, 2016

Minestrone Soup


 I found some fun noodles at the store the other day and decided to make a minestrone soup with them in an effort to get my kids to eat vegetables.  My kids were so distracted by seahorses and octopus they didn't complain!


Minestrone Soup

Ingredients:

4 cups vegetable or beef broth
1 cup minced onion
1/2 cup shredded zucchini
1/2 cup cut green beans
1/2 cup diced carrots
4 tsp. minced garlic
1 can (14 ounces) diced tomatoes
2 Tbsp. dried parsley
1 1/2 tsp. oregano
1 1/2 tsp. salt
1/2 tsp. ground black pepper
1/2 tsp. dried basil
1/4 tsp. dried thyme
1 cup noodle of your choice

       Put all the ingredients except the noodles in a large saucepan and cook simmer for 20 minutes.  Add the noodles and cook as long as the box says.  Enjoy!


Monday, August 22, 2016

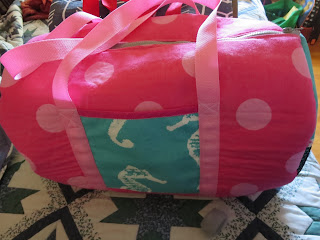
Christmas Presents- Duffle Bags

I know I'm crazy, but I finished my kids' Christmas presents.... or at least one of them.  When I get an idea I have to act on it and it drives me crazy until its done.  There needs to be a word for the opposite of a procrastinator.  I'm that... obsessive compulsive maybe?
 My kids needed travel bags.  We watched some friends' kids over-night and they had their own duffel bags.  I thought, "my kids need this!"  So I found a pattern I like online here.
 I just changed the fabric to canvas.  I didn't like the laminated fabric idea.  They were super easy to make.  It was just a little tricky to find all the different notions and things like webbing.  That was SO hard to find!


 I used just normal cotton fabric on the lining inside and sewed on the zipper a different way than they show in the instructions because I thought my way was better and easier.  Just sew the zippers on to the fabric right sides together.  That tape stuff looked annoying.

 Then I sewed the kids toiletry bags and put a toothbrush holder inside.  WALA!  They are ready to travelling except they have to wait until Christmas.